Wednesday, 26 March 2014

A small project jumps the queue

I'm supposed to be finishing the Easter bunnies and baskets for the grandchildren and I really ought to finish the Fatty Lumpkin pony, which is currently stalled at the assembling stage. So what do I do? I end up making a quick pot-holder to use up the last of the James C. Brett Craft Cotton. I now know what sort of project it's good for and if I need more, I can buy it as and when required, so it seemed like a good idea to use up the ends of the balls on something useful rather than have them sitting around in my stash.

And my current pot-holders are getting very tatty. :)

It only took a few days.

Note: I don't usually get more than an hour each day -- two at the most -- to crochet and I'm not a fast crocheter, preferring to plod along in a meditative fashion. I'm sure that a speedy crocheter would be able to whip one of these up in an evening.

To use up the very last ends, I made a couple of little lid-lifters. The pot-holder is lovely and thick, but therefore would be too bulky for lifting the lids on my stainless steel saucepans or removing the lids from the glass casserole dishes.

Circular pot holder

Saturday, 22 March 2014

It will soon be Easter

For the past week I've been busy making Easter presents for the grandchildren. I didn't want to just buy chocolate eggs because the postage makes it a very expensive way to buy chocolate. In fact I think last year I sent money to our son and daughter and asked them to buy eggs on our behalf for the grandkids.

However, this year I intend to do better.

I had seen some cute and easy bunny patterns on Ravelry, so I started making those first.

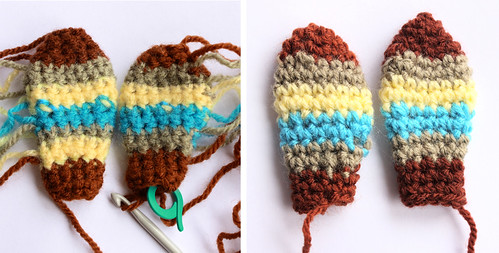
Here's the first bunny almost ready to assemble.

Crochet Easter bunny WIP

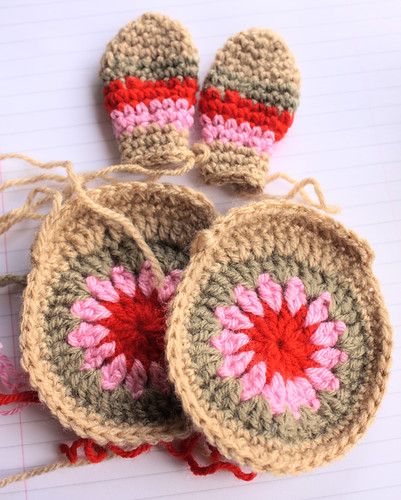
I know a lot of you like to weave in your ends as you go, but the photo below shows why I prefer to wait until I've finished and I'm sure it's all correct. I making 3 bunnies and I had almost finished the sixth ear when I realised that I'd done something stupid whilst making the 5th ear and somehow added in an extra yellow stripe! If I'd woven the ends in as I went, I'd probably have had to throw the ear away as too fiddly to frog, but it didn't take long to correct and now I have all the bunny parts and I'm almost ready to start sewing them together.

Too many stripes!

I haven't actually started sewing them yet because:

a) A lot of the yarn was reclaimed from a failed project that had been sitting around for more than 12 months gathering dust so I thought I ought to wash the bunny pieces.

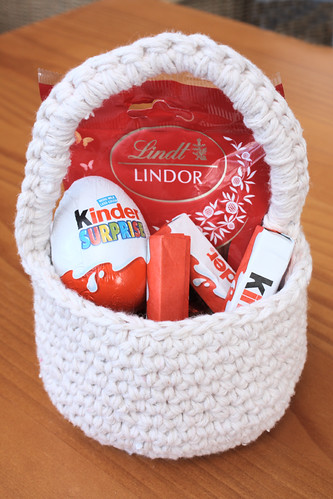
b) I started making three little baskets to put the chocolate and bunnies in.

I had some James C. Brett Craft Cotton sitting around that I'd bought by accident a couple of years ago. How can you buy yarn by accident, you may be wondering? Well, it was while I was making the Funny Faces blanket for the latest grandchild and I thought it would be soft, like the James C. Brett Cotton On I was using for the blanket. Unfortunately, it's a cotton intended for dishcloths and such like, so it's more like string!

However, it does make very nice little baskets. :)

Here's the two-handled version.

Easter Basket -- two handles

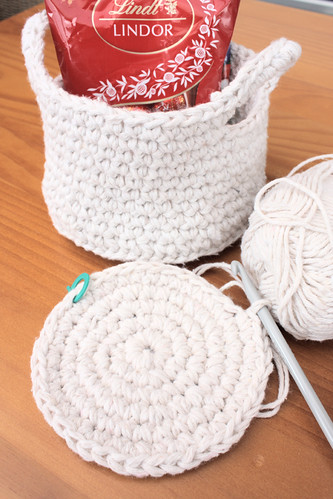
And here's the version with one handle.

Easter basket -- single handle

Anyway, everything is coming together. The bunnies can be assembled as soon as the pieces dry, I have bought a variety of chocolate and mini-eggs, the third basket is almost complete and I've been making some pretty little flowers for decoration. All being well, everything will be ready to post next week in good time for Easter.

Thursday, 27 February 2014

Slow but steady progress

I am making a Fatty Lumpkin pony, one of Heidi Bears' delightful African flower animals. I finished all the motifs and I'm now busy joining them all together.

It's a slow process, but I'm getting there. Doing the join-as-you-go has involved quite a few mistakes and some muttered curses, but it does create a neat finish and it means that the joining is accomplished as you crochet the final round of the motifs. Ideally I would have liked to make a hippo first. Hippos are blobby in shape and they therefore look a bit easier than a Fatty Lumpkin, but due to starting a new part-time job I didn't have time to make the creatures for Christmas presents and the eldest grandchild (who is getting the pony) has her birthday first.

The only consolation is that the hippo should seem easy once I've mastered the pony!

So far I have put together Fatty's bottom and hind legs.

Fatty Lumpkin is progressing

The crochet is resting on some books I've been using for work teaching a GCSE English re-sit class and a couple of modules on a foundation degree.

Monday, 24 February 2014

In which I finish a hat just as the weather turns warm

I have finished another project. This time it's a slouchy hat. To be honest, I would never have attempted the pattern based on the photos posted with it, but someone on Ravelry had done it in a chunky tweed effect and added a flower. As I had some blue Marble Chunky to use up, I decided to copy what she did.

Blue crochet slouchy hat

I didn't do as many increases or as many rows as the pattern says because of using different yarn and hook size, but I'm very pleased with the results. It actually looks good on me! If I sound surprised, it's because it's not easy to find hats that suit me.

Blue crochet slouchy hat

The pattern is available free here. The flower was from Crochetgeek, also on Ravelry and available here on the Crochet Geek blog.

I was planning on wearing the new hat for our visit to London later this week, but the weather (which has never dropped below freezing all winter) has just turned even warmer, so my poor hat may not get an outing until next winter. Though having said that, March can be very cold and windy, so we will see. :)

Saturday, 22 February 2014

Giving cushions a makeover

Partly to brighten up our sitting room and partly to use up all the yarn I bought for projects that are not now going to happen, I've decided to revamp all the cushions. This is the first. I think it came out quite well, considering I just improvised the design.

I used the Redheart corner-to-corner pattern to make 2 squares which were sewn together round 3 sides and buttons added on the back of the cushion to close the top. The border is just a simple shell stitch, a simplified version of the border in the Redheart pattern. (I didn't like the picots, so left them out.) The yarn is James C. Brett Marble Chunky from my stash. Very simple and quick to do and it matches the snuggly corner-to-corner blanket I made for myself!

Front

Corner-to-corner cushion

Back

Button fastening

I plan to work my way around all the cushions now, trying out different designs. A cushion cover is an good size for experimenting with new stitches and there are only so many blankets a small house and two people can use! :)

Sunday, 9 February 2014

How to decrease when crocheting the corner-to-corner stitch

Someone on the Creative Crochet Crew -- The Group Facebook group was getting in a muddle over where exactly to place the slip stitches for the decrease when making a corner-to-corner blanket. In order to try to help, I did some photos which I thought I'd also post here, so I have the tutorial handy in case anyone else has a problem.

1. Here is what the piece looks like as you finish the last of the increase rows. Until now, each row has been getting longer, but from now on, we're going to decrease to stop the piece growing and instead get it to narrow down to a point.

The end of the last row of increases

2. Turn the work and slip stitch into the trebles (US double crochet). I find that crocheting into just the two nearest the 3 chain loop works best.

Slip stitch into the trebles

3. Now slip stitch into the 3 chain loop which is on the same block.

Slip stitch into the 3 chain loop

4. Chain 3. You can see where the next block will fit. The decrease has started to make a straight edge and from now on, the project begins to decrease in width.

Make 3 chains

5. Here the decrease is complete and we're working the rest of the row.

At the end of this row, you can either carry on increasing, in which case you will end up with a long rectangular strip, for example for a scarf. Or, after you have reached the end of the row and made the turn, you can start to decrease at this side as well.

Decrease complete

Saturday, 1 February 2014

Lots of African Flowers

After 2013 being the Year of Blankets, I intend to stick to smaller items this year, namely items for me to wear, bags and toys. As soon as I saw the cute Happypotamus and Fatty Lumpkin Pony designed by Heidi Bears, I knew I had to buy the pattern and make them.

And then 2013 turned into the Year of the Blankets. :)

However, finally all those projects are completed and I have therefore spent the past few days making African Flower motifs whenever I got a spare moment. So far I have 10 hexagons. Still quite a few motifs to go and then the real fun begins when I try to put them all together, but Heidi Bears pattern is very clear with lots of photos, so it should be OK.

Here is a motif in progress. I'm using acrylic double knitting and a 3.50 mm hook. I tend to crochet rather tightly, so I'm hoping these will keep the stuffing in OK.

IMG_8779 crochet edge copy

And here is a pile of colourful hexagons.

IMG_8787 African flowers copy

I'll post again when I have a finished pony.